
Overview
SCRT (SECRET) is a small application that embeds text inside of an image by modifying individual bits. I am going to start off with a high-level explanation of how it works, and then we'll go over some of the code. We'll touch on topics like bitwise operations and steganography. You will see how the modified image with a message looks essentially identical to the original.
Understanding the Least Significant Bit (LSB)
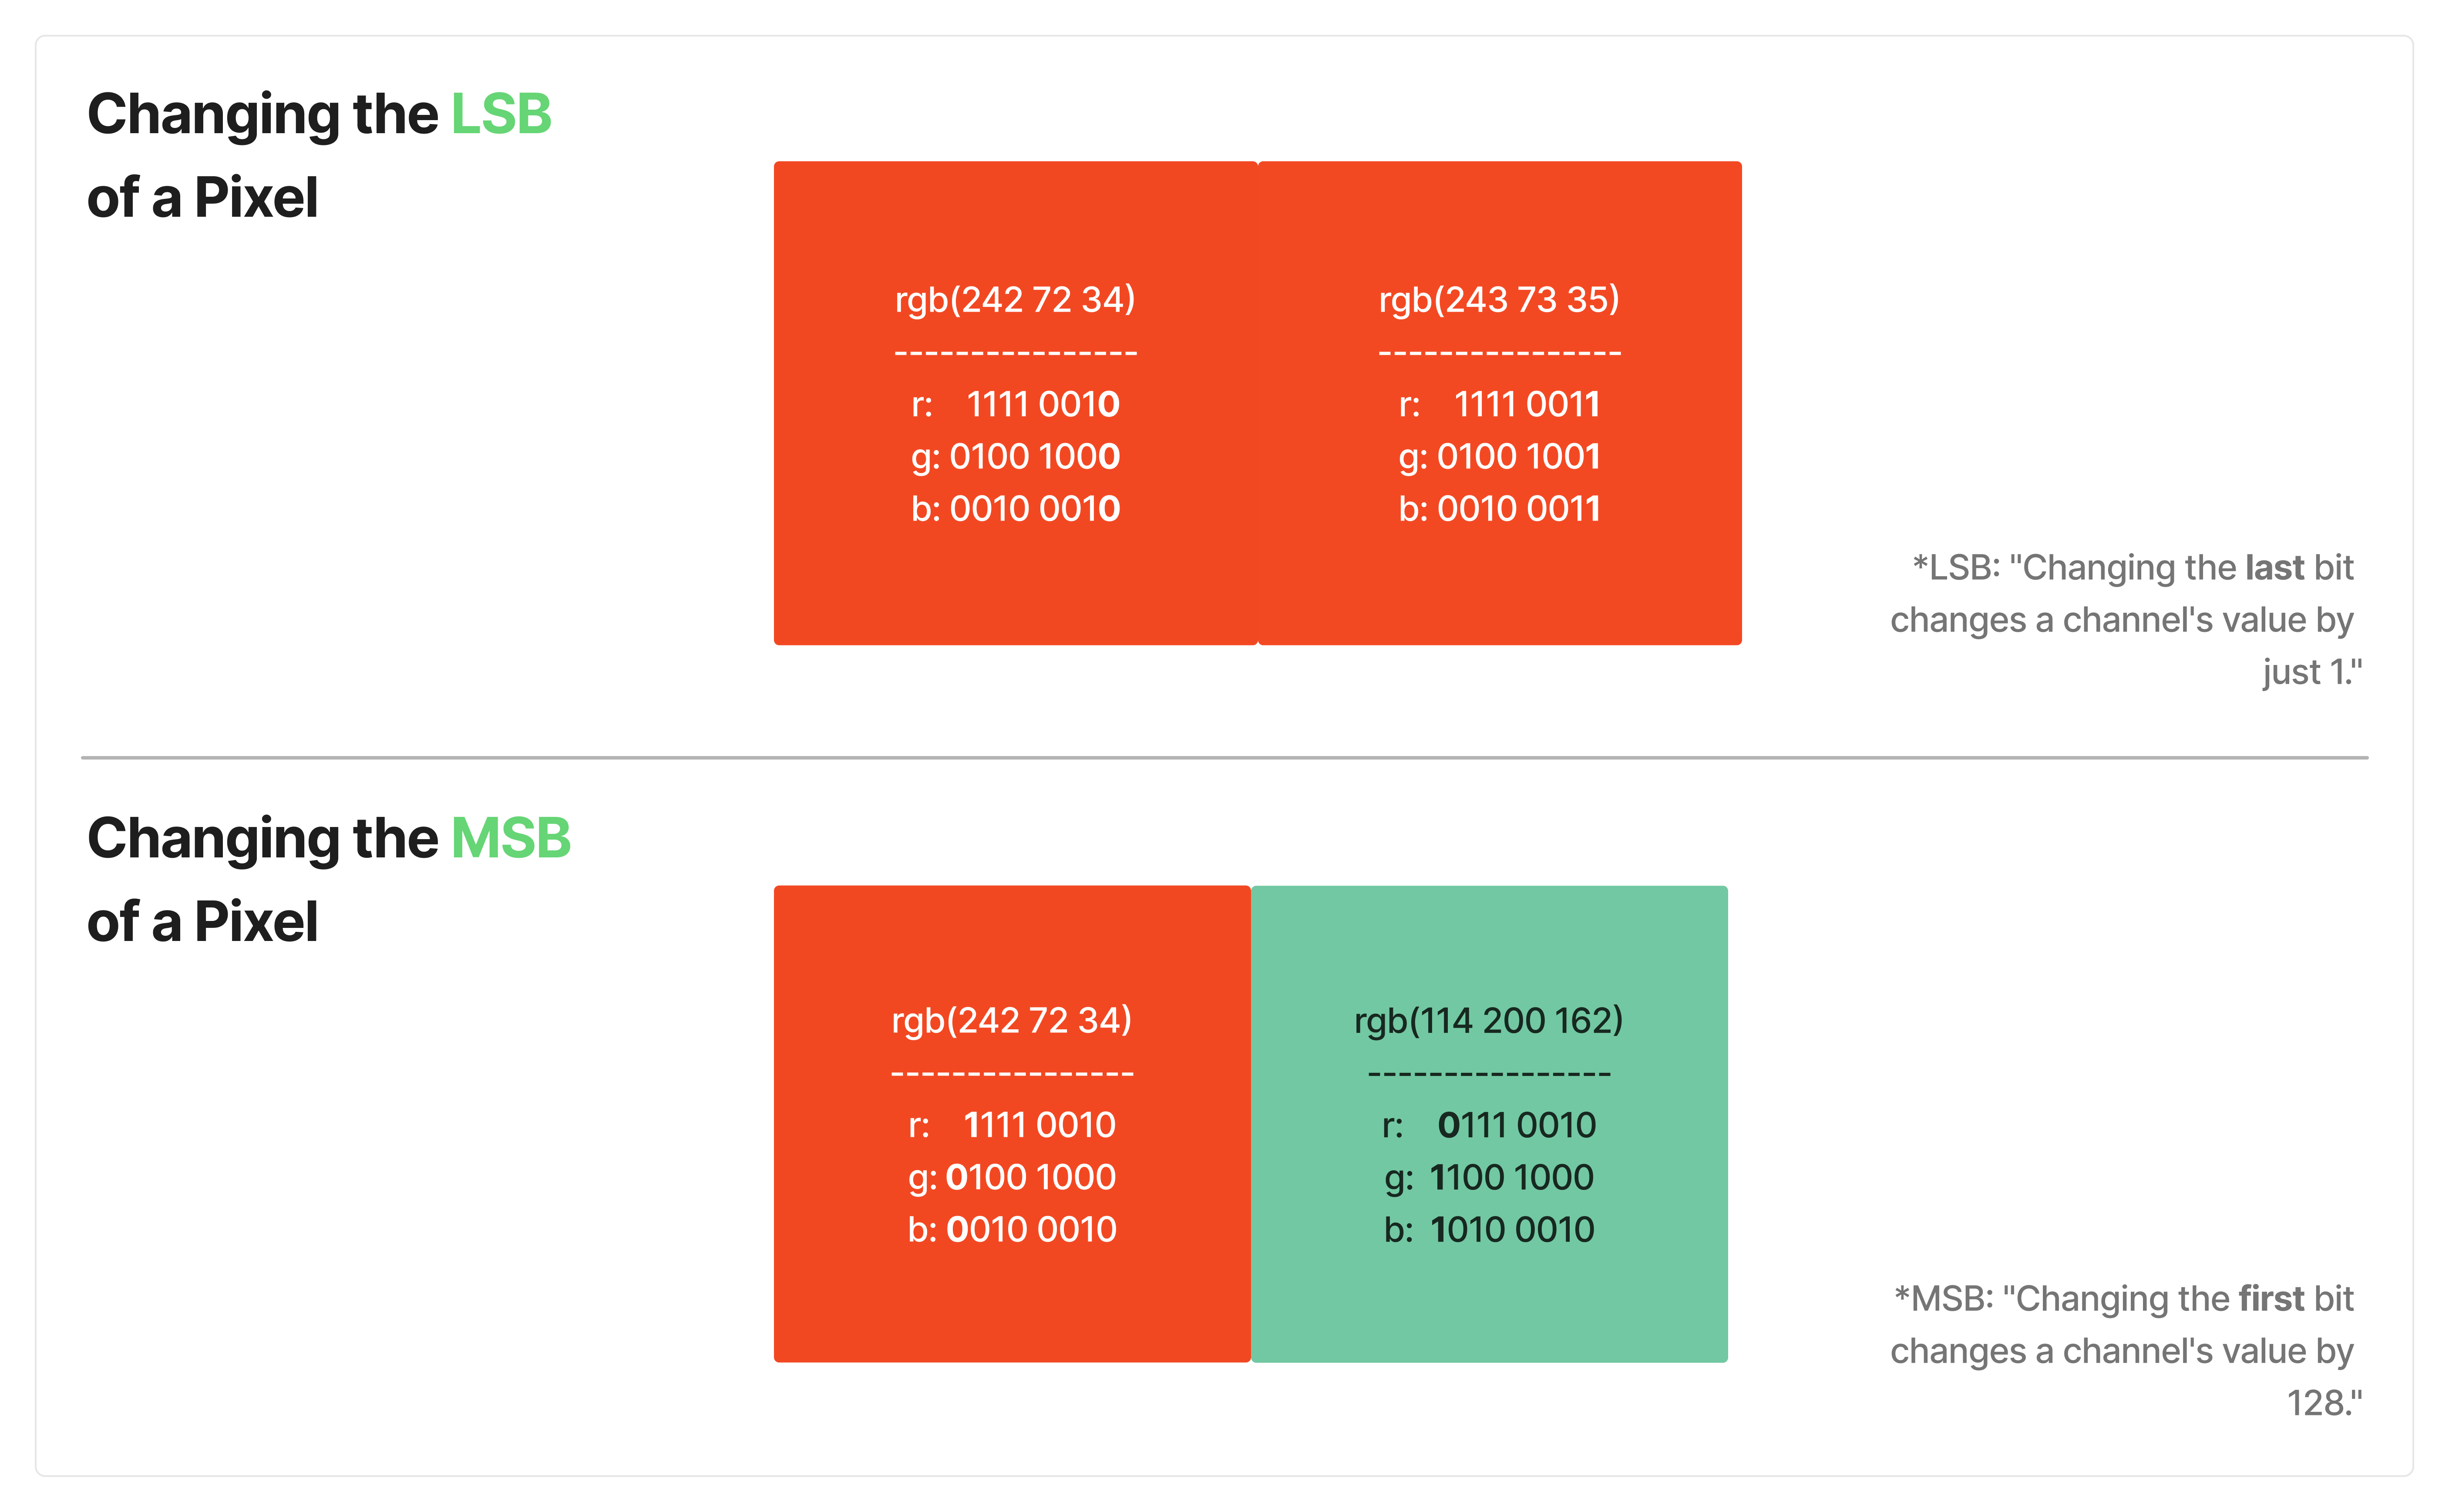
Images are composed of pixels, each of which has three color channels: Red, Green, and Blue (RGB). Mixing these colors together gives you any other color. Each channel is an 8-bit value ranging from 0 to 255. The Least Significant Bit (LSB) is the last (rightmost) bit in that value. When we use the & (AND) operation on a channel value, we're able to clear the LSB. That is why we create a mask that contains an 8-bit value of all 1's except for the final 0. It will always set the final bit to a 0 so it can be replaced. We use the | (OR) operation to set the LSB of the channel value to the message bit.
mask = 0b11111110

# flat[i] is an 8-bit color channel value extracted from the image
flat[i] = (flat[i] & mask) | int(bit)
By changing the LSB, you are barely changing the color of a pixel. The difference is not noticeable to the human eye. Here is how slight the difference is compared to changing the Most Significant Bit (MSB):
Preparing the Image
from PIL import Image
import numpy as np

img = Image.open(fname).convert("RGB")
pixels = np.array(img)
flat = pixels.flatten()
Pillow (PIL) was used to open and convert the image. It is a popular, community-supported image processing library for Python. I utilized the convert() function to standardize the pixel format into 3 separate color channels (Red, Green, and Blue). This way, each pixel has three 8-bit color channels (as explained previously).
NumPy was used to make the pixel data easier to manipulate. It converted the image into an array so that I was able to access and manipulate the pixel values. It would generate something like this:
[
    [[242, 72, 34], [100, 150, 200]],
    [[50, 60, 70],  [10, 20, 30]]
]
Each innermost list represents one pixel's RGB values.
.flatten() takes the array and turns it into a single, one-dimensional array. So for the example above, it kind of just presses everything together like you'd see in a normal list.
[242, 72, 34, 100, 150, 200, 50, 60, 70, 10, 20, 30]Since the program needed to modify individual color-channel values in order to store message bits, I wanted to make sure it was easy to loop through:
for i, bit in enumerate(bits):
    flat[i] = (flat[i] & mask) | int(bit)
Encoding a Message
The first thing we need to do is convert our message into binary. Since we're working with individual bits, we can't directly insert regular text into the image.
msg_len = f"{len(message):08b}"
msg = ''.join(f"{ord(c):08b}" for c in message)

bits = msg_len + msg
Let's break this down further.
First, len(message) gets the number of characters in our message. We convert this number into an 8-bit binary value using :08b. This is important because we need to know where our message ends when we eventually decode it. The header uses 8 bits, so it can store a message length of up to 255 characters.
Next, we loop through each character in the message and use ord() to convert it into its numerical character code. We then format that number into binary using the same :08b formatting. This gives us 8 bits per character for standard ASCII characters.
Finally, we combine the message length and the actual bits into one long string.
You might be wondering why we store the message length along with the message itself. When decoding, we need to know how many bits to extract from the image. By storing the character count in the first 8 bits, we can tell the decoder exactly how many characters to read.
Now that our message is in binary, we can start embedding it into the image.
Embedding the Message
This is probably the most important code block in the entire project.
flat = pixels.flatten()
mask = 0b11111110

for i, bit in enumerate(bits):
    flat[i] = (flat[i] & mask) | int(bit)

pixels = flat.reshape(pixels.shape)
Image.fromarray(pixels).save(svas)
Remember that flat[i] refers to a single color channel, so every three consecutive values in flat represent one pixel (RGB). The loop runs through the same number of indices in both flat and bits.
Remember our bits = header + message_bits? The first eight channels store the message length header. The next eight contain the actual character.
Here is an example with a message "c":
| Channel | Purpose | Bit Embedded |
|---|---|---|
flat[0] – flat[7] | Message length header | 00000001 |
flat[8] – flat[15] | Message "c" | 01100011 |
Once the loop finishes, the message has been embedded into the image's color channels. From there, the pixels get reshaped, and the image gets regenerated and saved. Now we have a new image containing your embedded message.
Decoding a Message
Decoding the message also involves converting the image into a NumPy array and flattening it into individual color-channel values.
pixels = np.array(img)
flat = pixels.flatten()

# Read the first 8 LSBs to retrieve the message length
length_bits = ''.join(str(flat[i] & 1) for i in range(8))
msg_len = int(length_bits, 2)

# Extract the message bits after the 8-bit header
bits = ''.join(
    str(flat[i] & 1)
    for i in range(8, (msg_len * 8) + 8)
)

# Convert each group of 8 bits back into a character
msg = ''.join(
    chr(int(bits[i:i+8], 2))
    for i in range(0, len(bits), 8)
)

print(f"Decoded: {msg}")
I'll summarize the decoding part since the core is the same as before. Just reverse.
- Flatten the image: Just like encoding, the image is converted into a NumPy array and flattened into individual color-channel values.
- Read the header:
flat[i] & 1extracts the LSB from each of the first eight channels. These bits are joined together and converted from binary into an integer usingint(). This gives us the original message length. - Extract the message: Using the length from the header, the program reads the next
msg_len * 8LSBs. - Reconstruct the message: The extracted bits are split into groups of eight. Each group is converted into an integer, then
chr()converts that integer back into its corresponding character.
The important takeaway is that decoding reverses the encoding process. Instead of modifying each channel's LSB, you're reading it to reconstruct the original message.
Technical Notes
- Not encryption: SCRT uses steganography to hide a message, but it does not encrypt it. Someone who knows how the program works can retrieve the message. This is only a proof of concept.
- Image capacity: Each message bit occupies one color channel. Your image would need to have at least
8 + (8 * len(message))available channel values. - BMP format: Saving an image as a BMP helps preverse the individual pixel values. JPEG compresses and will alter those values and destroy the embedded message.
- Character limitations: This was designed for ASCII characters. Any character outside of the 0-255 range can produce more than 8 bits so the decoder would break.
Thanks for reading ✓